Module Assembly
This guide details the components and steps to assemble the QuadroFleet drone module. The system is designed for compatibility with off-the-shelf FPV drone parts, keeping costs low while ensuring performance.
Bill of Materials (BOM)
| Category | Component | Approx. Cost (€) | Link |
|---|---|---|---|
| Drone Frame & Core | Mark4 7-inch frame | 16 | AliExpress |
| iFlight XING E Pro 2207 1800KV 6S (4x) | 50 | AliExpress | |
| SpeedyBee F405 V4 FC + 55A ESC Stack | 80 | AliExpress | |
| Gemfan Hurrikan MCK v2 (2 pairs) | 3 | AliExpress | |
| GEP-M10Q GPS (optional, recommended) | 25 | AliExpress | |
| Video System | SSC30KQ Camera + 1.7mm Lens (OpenIPC) | 27 | AliExpress |
| Quectel EC25 4G Modem | 40 | AliExpress | |
| 4G FPC-Antenna Signal Booster | 2 | AliExpress | |
| Power System | DC-DC 12V-5V 3A Buck Converter | 2 | AliExpress |
| 3S/6S LiPo Battery Pack (3000–6000mAh) | 20–90 | Varies | |
| Miscellaneous | Wires, XT60/XT30 Connectors, Mounting Hardware | ~10 | Local/Varies |
| Control | XBOX/PlayStation/FPV RC Controller (USB) | Varies | Local/Varies |
| Connectivity | SIM Card with Mobile Data (4G/5G) | Varies | Local Provider |
Total Estimated Cost: €275–345 (excluding controller and SIM card).
Dead links: : if links to components are no longer available, try to find new ones by name.
5G modems: 5G modems can also be used, but at the moment they are much more expensive than 4G.
Assembly Steps
-
Frame and Core Setup:
- Assemble the Mark4 7-inch frame per the manufacturer’s instructions.
- Install the iFlight XING E Pro 2207 motors (4x) and secure them to the frame.
- Mount the SpeedyBee F405 V4 FC + ESC stack centrally, ensuring access to UART ports.
- (Optional) Install the GEP-M10Q GPS module for enhanced tracking.
- (Optional) Print cases for SSC30KQ and GPS module. STL files are available here.
-
Video and Connectivity:
- Mount the SSC30KQ camera with a 1.7mm lens, ensuring a clear forward view.
- Connect the camera to the flight controller’s UART port (e.g., UART2) for CRSF telemetry.
- Secure the DC-DC buck converter to step down battery voltage to 5V for the camera and modem.
- Install the Quectel EC25 4G modem and connect the 4G FPC antenna for optimal signal.
-
Power System:
- Connect the 3S/6S battery to the ESC via an XT60 connector.
- Wire the buck converter to power the camera and modem (5V, 3A output).
- Ensure all connections are insulated to prevent shorts.
-
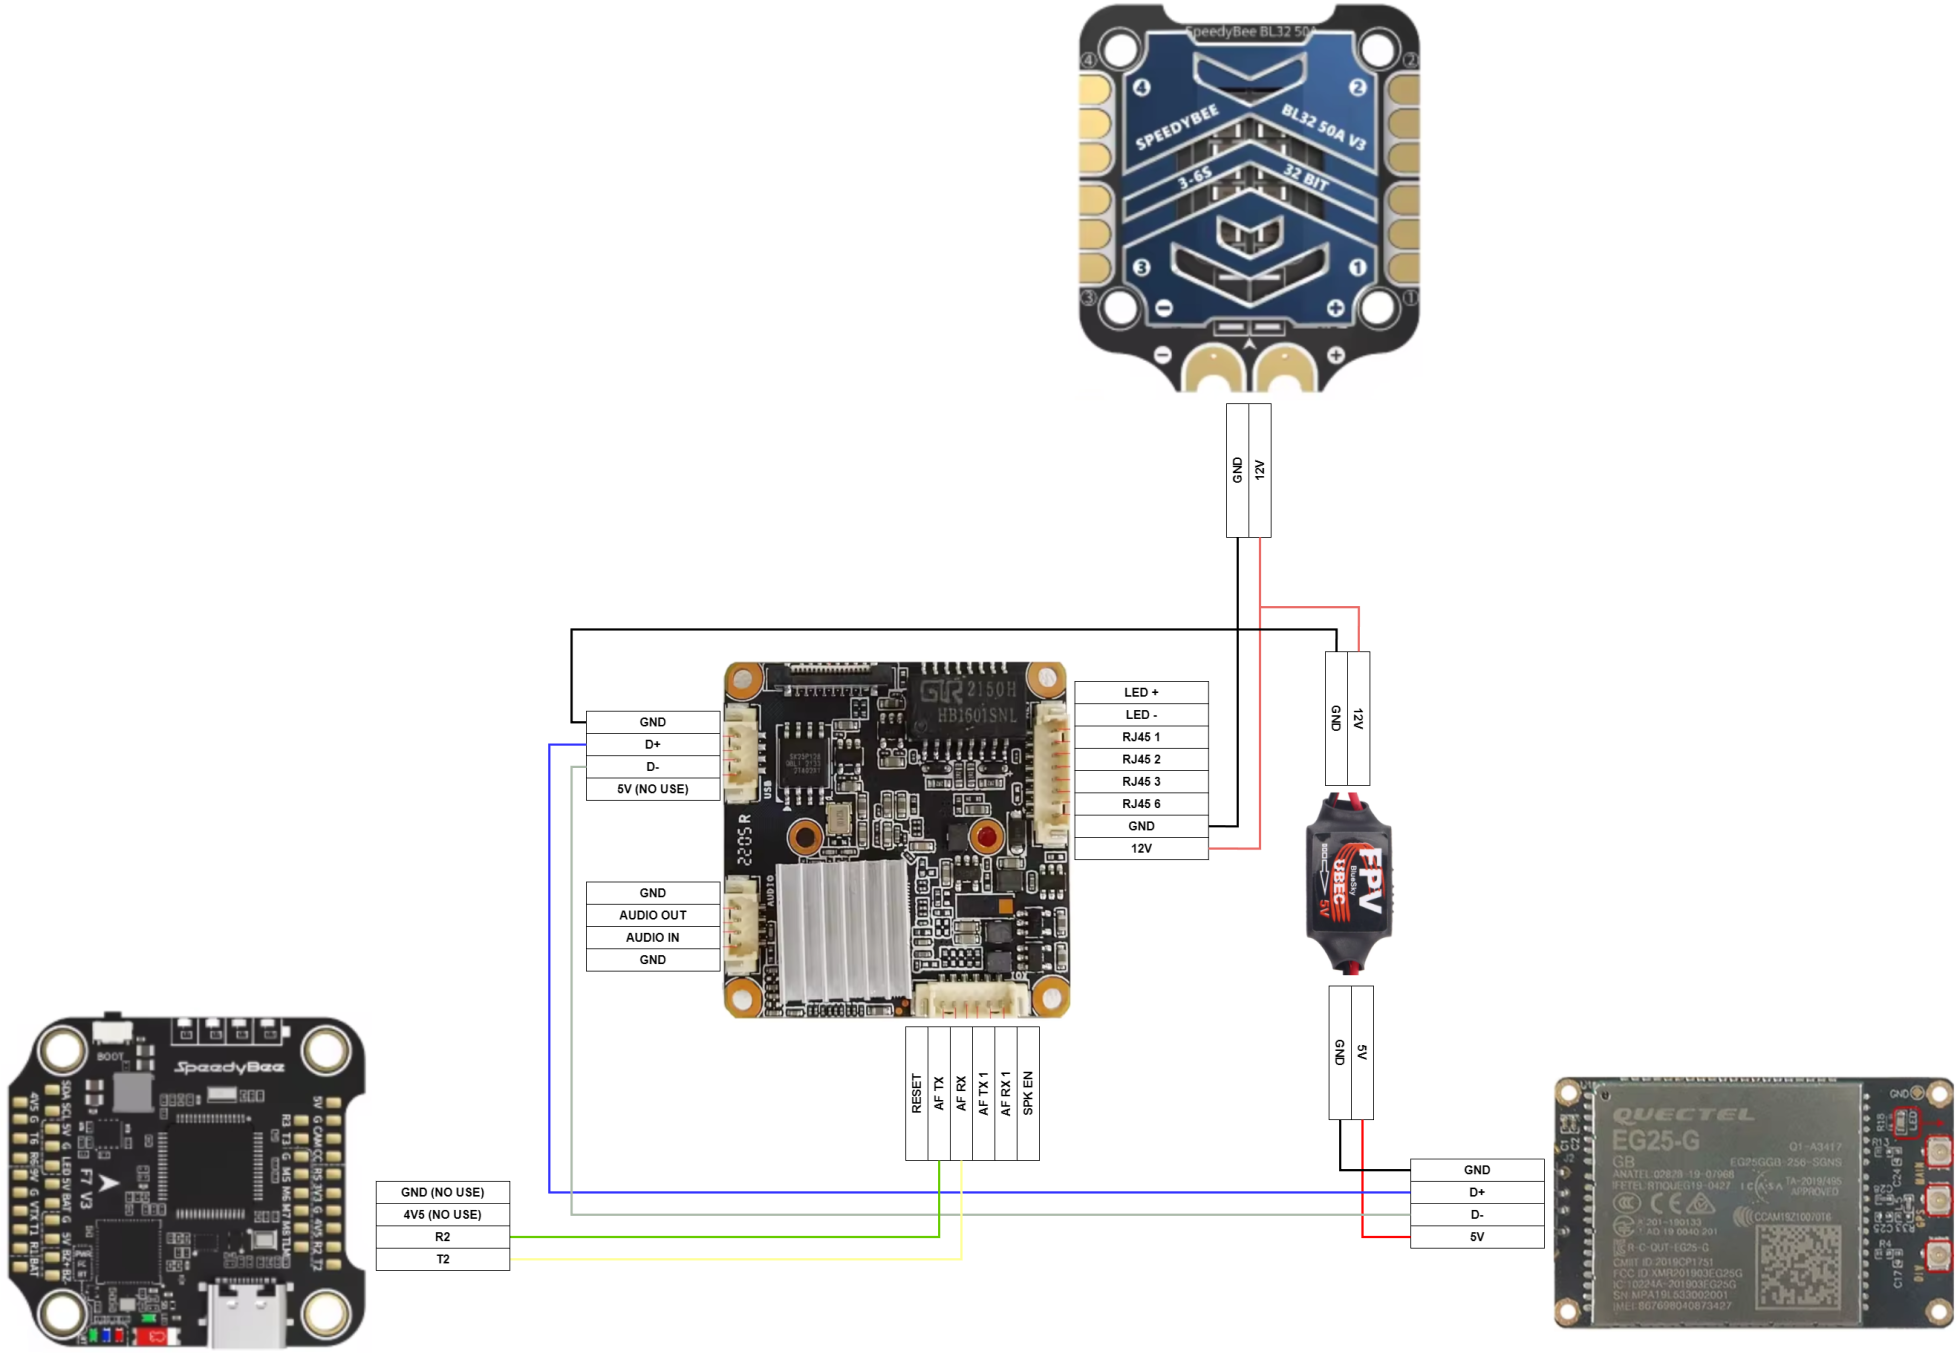
Wiring:
- Use the diagram below for connections:
- Camera ↔ Flight Controller: UART (TX/RX) for CRSF protocol.
- Modem ↔ Camera: USB for data.
- Buck Converter: Battery → 12V input, 5V output to modem.
- Secure wires with zip ties to minimize vibration damage.
- Use the diagram below for connections:
⚠️ IMPORTANT: Pay close attention to powering the EC25 modem. The power output from your camera may not be enough, which can cause unstable operation. For this reason, it is essential to supply the modem from an external 5-volt power converter. It is also important to ensure a common ground (GND) between the flight controller and the modem; otherwise, USB data communication will fail.
- Testing:
- Power on the drone and verify the flight controller boots correctly.
- Check camera connectivity (or flash it first) via the OpenIPC web interface (default IP via DHCP).
- Test modem connectivity by inserting a SIM card and confirming 4G/5G signal.
- Attach Gemfan Hurrikan MCK v2 propellers (check rotation direction: CW/CCW).
Notes
- Ensure all components are securely mounted to withstand vibrations.
- Use high-quality soldering for reliable connections.
- Verify battery capacity matches your flight duration needs.
- For detailed wiring, refer to the SpeedyBee F405 manual and OpenIPC documentation.